Deploying Azure Virtual Machines from VM Depot using PowerShell
VM Depot is a community-driven catalog of open source virtual machine images. Azure management portal can be used to copy these VM images into “My images” of your Azure subscription. Once we have the community image in “My images”, we can create a VM from that. This is a multi-step process. There is no PowerShell equivalent of doing this. We can, however, use Azure CLI to achieve this in a single command. I will show you how this can be done using PowerShell. For this example, I will deploy Kemp’s Virtual LoadMaster from VM Depot.
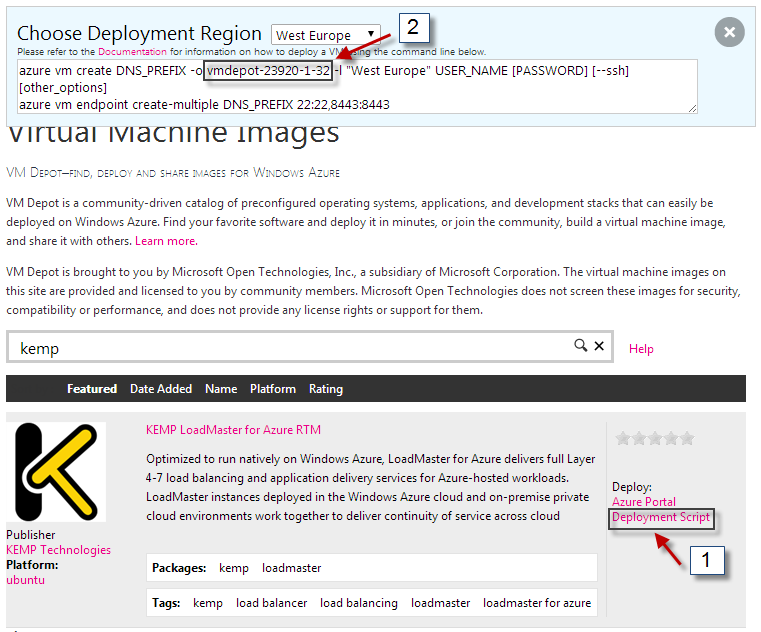
Before we go to the PowerShell method, let us look at how this is done using Azure CLI. The deployment script for the Azure CLI can be obtained from the VM Depot portal.

I wanted to understand how Azure CLI can achieve what is not available in Azure PowerShell. So, from what I found, these are the steps involved.
- Get the VM image name. In this example, “vmdepot-23920-1-1” is the VM image name.
- Retrieve the VHD using the VM image name. Azure CLI uses the OData service provided by VM Depot.
- Copy the VHD blob from community images container obtained in step 2 to your storage account.
- Create a VM image from the copied VHD blob.
- Create a new VM from the image created in step 4.
We seriously need PowerShell here! 🙂
Step 1 is already known. We can just grab the VM image name from the deployment script given by VM Depot. Let us go to step 2.
Retrieve VHD blob path from VM image name
For this part, I reverse engineered what Azure CLI was doing. This is when I came to know that VM Depot has a OData service. We need to use the ResolveUid endpoint and pass the VM image name as the uid.
(Invoke-RestMethod -Uri 'http://vmdepot.msopentech.com/OData.svc/ResolveUid?uid=%27vmdepot-23920-1-1%27').ResolveUid.Element.BlobUrl
Copying the VM VHD blob to Azure storage account
This is easy. We can use the Azure cmdlets to achieve this. You need a storage account, access key, and an existing container. You can look at the Azure management portal for this information. The following code snippet helps you copy the VHD blob to your storage account.
$BlobUri = "http://vmdepoteastus.blob.core.windows.net/linux-community-store/community-34189-c64af7cb-cfec-4c4f-b893-99fd4debdf3a-1.vhd"

Select-AzureSubscription "your-subscription-name"
$StorageAccount = "your-storageaccount-name"
$StorageKey = "your-storageaccount-key"

$DestinationContext = New-AzureStorageContext –StorageAccountName $StorageAccount -StorageAccountKey $StorageKey
$ContainerName = "your-container-name"

$StorageBlob = Start-AzureStorageBlobCopy -SrcUri $BlobUri -DestContainer $ContainerName -DestBlob "kemp1.vhd" -DestContext $DestinationContext
$CopyStatus = $StorageBlob | Get-AzureStorageBlobCopyState

While ($CopyStatus.Status -eq 'Pending') {
   $CopyStatus = ($StorageBlob | Get-AzureStorageBlobCopyState)
   Write-Progress -Id 1 -Activity "Copying VHD BLOB to Azure Storage" -Status ("{0} bytes of {1} completed" -f $CopyStatus.BytesCopied, $CopyStatus.TotalBytes)
   Start-Sleep -Seconds 5
}

"Blob copy completed with status: $($copyStatus.Status)"
Once the copy process completes successfully, you can see the VHD added to the container in your storage account.

Creating VM image from the VHD
Once again, this is a simple task with the help of Azure PowerShell cmdlets. We need the location of the VHD we copied in the previous step. We can use the storage context created earlier to create this Uri.
$ImageLocation = "$($DestinationContext.BlobEndPoint)$($ContainerName)/kemp1.vhd"
We can use the Add-AzureVMImage cmdlet to add this VHD as a VM image.
Add-AzureVMImage -ImageName "Kemp" -MediaLocation $ImageLocation -OS Linux -Verbose
This usually takes a little while to show up in images. You can use the Get-AzureVMImage cmdlet to verify this.
Get-AzureVMImage -ImageName "Kemp"
Create a new VM from the image
We can use the New-AzureVM cmdlet to deploy the Kemp VLM.
$KempImage = Get-AzureVMImage -ImageName Kemp
$KempVLM = New-AzureVMConfig -Name "Kemp-VLM-1" -InstanceSize Small -ImageName $KempImage.ImageName | Add-AzureProvisioningConfig -Linux -LinuxUser "Ravikanth" -Password "Pass@w0Rd" -NoSSHEndPoint -Verbose
New-AzureVM -ServiceName "ravikemp" -VMs $KempVLM -WaitForBoot
This is it. A virtual machine has been deployed using a VM Depot image. You can use this procedure to deploy any VM Depot image.
While we are talking about Kemp VLM, let us see how we can complete the process of configuring Kemp VLM. We need to create the endpoints for accessing the VLM locally and externally.
The Add-AzureEndpoint cmdlet can be used to add the endpoints to the Azure VM.
Get-AzureVM -ServiceName "RaviKemp" -Name "Kemp-VLM-1" |
Add-AzureEndpoint -Name "Port22" -Protocol TCP -LocalPort 22 -PublicPort 22 -Verbose |
Add-AzureEndpoint -Name "Port8443" -Protocol TCP -LocalPort 8443 -PublicPort 8443 -Verbose |
Update-AzureVM -Verbose
Once we have the endpoints created, we can access the Kemp Web User Interface to license the VLM. You will require a Kemp ID to complete the licensing process.
Start-Process "https://VMPublicVIPAddress:8443/"
In the upcoming posts, we will see using Kemp PowerShell module to manage a Kemp VLM.
Share on: