Using the Windows Live APIs from PowerShell
Microsoft has recently unveiled a REST API for OneNote Live, and since PowerShell has had cmdlets for working with REST services since V3 was introduced it seems like a good opportunity to look at the Live APIs and how they can be called from PowerShell.
REST is not a protocol, but a design philosophy, every call to the API is self-contained – i.e. servers don’t maintain user sessions. Anything which calls the REST APIs for OneNote, OneDrive or other Windows Live services must authenticate using OAuth on each action.
Authenticating
We often think of authentication as proving to a system that we were on a list of approved users, and maybe the server offered some proof it wasn’t an imposter. OAuth solves a problem which didn’t really exist before cloud services: imagine that a web site you use offers to post for you on social media sites when you do something interesting. Should you give it your credentials so it can log in as if it were you? Would they be secure and manageable? Do you trust the service to only do what it said, and not mine your contacts list without asking? How can give a specified service (or any software) to limited rights for an open ended period of time? That’s where Oauth comes in.
The software/service which acts for the user must register as a “consumer” of ID information: it is given ID and a “secret”. Then it can send the user to get a token; it uses the token whenever it works with a server on the user’s behalf. The token identifies the user and the things which they have agreed the consumer can do on their behalf. If the user ceases to trust the consumer, they tell the server not to accept the token anymore. In simplified from, the process looks like this.
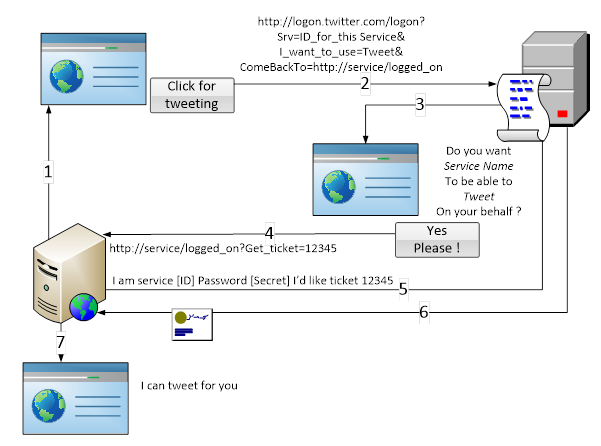
The Service which needs permission- the “consumer” – will put up a page with a link the user can click to allow it to carry out some action on another server.
The link contains a callback URL, a service ID and (usually) the permissions sought
The server granting permission will check the service ID and ask the user “Are you sure you want to allow this service to do these things for you?” If the user agrees, a token is generated. But if the token were issued at this point, anything could grab the service ID and masquerade as that service, so.
The token is stored and the user is redirected to the callback URL which has parameters added to say how to fetch the token
The consumer requests the token, and to prove it is the rightful user of the service ID includes its secret in the request.
The server releases the token to the consumer.
From now on the consumer can send requests with the token. The token identifies the user and proves they delegated some permission to the consumer.
For some services the token remains valid indefinitely, unless the user cancels it. Others – including Windows Live – issue tokens which expire after a short time, but also allow the consumer to request a fresh token without asking the user’s approval.
So let’s have a look at how this works with Windows Live and how we might use it from PowerShell.
Step 1 is to go to https://account.live.com/developers/applications/index–there is a different link for Windows 8.1 store applications, but for everything else this is the page to register an application: Click “Create Application” and follow the instructions. You can get back to the ID and Secret if you need to but for now make sure you have a copy saved and pop them into a new PowerShell script.
$ClientID = "000000001D1D1D1D"
$Secret   = "53cRET53cRET53cRET53cRET5EcReTSe"
Now we have a problem to solve. Live.com wants to use a web page to ask the user’s to approve the issuing of a token. And we’re in PowerShell not in a browser. Fortunately this problem has already been solved for us. Firstly Live provides a readymade callback URL https://login.live.com/oauth20_desktop.srf so anything which can show a web browser can redirect there. So we can build the request URL (in step 2 of the diagram like this.
$wlCallBackUri = "https://login.live.com/oauth20_desktop.srf"
$wlAuthUri     = "https://login.live.com/oauth20_authorize.srf?"+
                 "client_id=$ClientID"+
                 "&scope={0}"+
                 "&response_type=code" +
                 "&redirect_uri=$wlCallBackUri"
The Authentication URI has these parameters.
- Redirect URI – the page to go to after the user logs on
- Client ID – the ID for the application
- Response type – it is possible to ask for the token if we are going to perform a single operation but here we want a code, which will give us a renewable token.
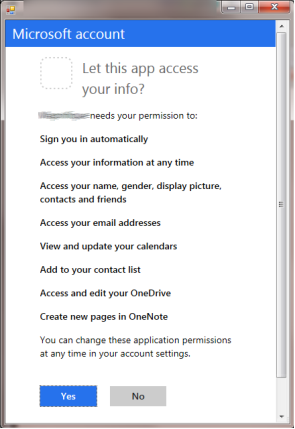
- Scopes. What will our application want to do? There is long list, and this will appear when the browser page pops up. For now there is a place holder {0} so we can insert the scopes later using the –f format operator
There is a long list of scopes at http://msdn.microsoft.com/en-us/library/live/hh243646.aspx most of the things were likely to want to do from PowerShell can be achieved with the following ones:
$Scope = @("wl.offline_access",   "wl.signin", "wl.basic", "wl.emails",
           "wl.calendars_update", "wl.contacts_create", "wl.skydrive_update",
           "Office.onenote_create")
- wl.signin Signing with MS account signs into the app
- wl.offline_access The ability to work even if when isn’t signed into Live
- wl.basic View user’s name, gender, avatar, contacts and friends
- wl.emails Access your own emails
- wl.skydrive_update Read from and write to OneDrive
- Office.onenote_create Add OneNote pages (but not view or edit existing ones)
- wl.calendars_update View and update your calendars
- wl.contacts_create Add to your Contacts list
Having setup the scopes it’s easy to put them into the authentication URI like this,
($wlAuthUri -f ($Scope -join "%20"))
One important thing to note is that the scopes are granted cumulatively: if an application requests access to Contacts and then later requests Calendar access, the user will be asked “do you want to give it access to Contacts and Calendars”.
Building a mini web browser as a Windows form in PowerShell
So, we have the URI we want–now it’s just question of getting it to appear in a web browser and getting the result back to PowerShell. Fortunately this problem has been solved; the code below is based on some from the Scripting Guys Blog
Add-Type -AssemblyName System.Windows.Forms

$form = New-Object -TypeName System.Windows.Forms.Form -Property @{
               Width=440;Height=640}
$web  = New-Object -TypeName System.Windows.Forms.WebBrowser -Property @{
               Width=420;Height=600;Url=($wlAuthUri -f ($Scope -join "%20")) }
$DocComp  = {
        $Global:uri = $web.Url.AbsoluteUri
        if ($Global:Uri -match "error=[^&]*|code=[^&]*") {$form.Close() }
}

$web.Add_DocumentCompleted($DocComp)
$form.Controls.Add($web)
$form.Add_Shown({$form.Activate()})
$form.ShowDialog() | Out-Null
This starts by defining a form and a WebBrowser control: the browser is just wide enough to hold the page that Windows Live returns and a scrollbar (the scrollbar will be needed if there are many scopes listed) and the form is just a little bigger.
Then a script block is defined which is run when the WebBrowser control finishes loading a document. This saves the URI to a global variable, and if is either an error or contains the code the form is closed. Since the browser may go via other pages on the way to getting the code this check is important.
Control returns to the script in one of three cases:
- The user just closes the form.
- The user Clicks “No” and error is returned.
- The user Clicks “yes” and a code is returned.
Using Invoke-RestMethod
This code will be in $URI. The following section uses the Invoke-RestMethod cmdlet, to fetch and process the token.
This cmdlet needs four parameters, the HTTP method (POST in this case), the URI to POST to, the content type of the body and the body itself– which contains the App ID, the Secret and the Code.
if ($Uri -match "code=([^&]*)") {
  $wlTokenUri  = "https://login.live.com/oauth20_token.srf"
  $wlTokenBody = "client_id=$ClientID&client_secret=$Secret" +
                 "&redirect_uri=$wlCallBackUri" +
                 "&grant_type=authorization_code&code=" + $Matches[1]
  $response   = Invoke-RestMethod -Method Post -Uri $wlTokenUri -Body $wlTokenBody`
                                  -ContentType "application/x-www-form-urlencoded"
  $wlAccess   = $Response.access_token
  $wlScope    = $Response.scope -split "\s+"
  $wlRefresh  = $Response.refresh_token
  $wlExpiry   = (Get-Date).AddSeconds([int]$Response.expires_in -10 )
}
Invoke-RestMethod builds the HTTP request and processes the body that is returned. Live.com will return either 3 or 4 fields.
- Access_token is the token to use in all the subsequent calls to the services.
- Scope. Scopes accumulate. If the user has already granted Calendar access, to this application, and this request is for OneNote access, the user will be asked if they want to give Calendar AND OneNote Access. If they agree the full list of scopes is returned.
- Expires_in is the number of seconds for which the token is valid. Since there is no time given, this is only useful if we convert it to an expiry time – I subtract a few seconds to make sure that the token is always refreshed before it times out.
- If the request is includes the off line access scope there is also a Refresh_token. This is used in a very similar way to the initial code, just building a different token body.
$wlTokenBody = "client_id=$ClientID&client_secret=$Secret" +
               "&redirect_uri=$wlCallBackUri" +
               "&grant_type=refresh_token&refresh_token" + $wlRefresh
The final code I built implements a function Use-WindowsLive which saves the response to an XML file using the Export-Clixml cmdlet, and puts all the parts of the response into global variables. The function takes an optional -Scope parameter and looks to see if there is an Access token with time left, or a refresh token that can be used to get a new access token or if it can’t find either it looks for a XML file and imports the refresh token and then processes that. User approval is only needed if neither token can be found or if new scopes are requested.
Calling the Live Rest APIS
Once the PowerShell has a token it can start making REST calls to live services, and it would be useful to find out which user’s information the script is working with. This involves another call to Invoke‑RestMethod The same base URI is used for many calls:
$wlApiUri = "https://apis.live.net/v5.0"
Invoke-RestMethod -Uri "$wlApiUri/me?access_token=$wlAccess"

id           : 1exxxxxxxxx17
name         : James O'Neill
first_name   : James
last_name    : O'Neill
link         : https://profile.live.com/
gender       :
emails       : @{preferred=xx@xxx.com; account=xx@xxx.com; personal=; business=}
locale       : en_GB
updated_time : 2014-03-22T17:09:54+0000
So it would be simple to store the name like this
$wlUser = (Invoke-RestMethod -Uri "$wlApiUri/me?access_token=$wlAccess").name
Working with OneDrive
This pattern of calling Invoke‑RestMethod with a URI of https://apis.live.net/v5.0/SOMETHING?accesstoken=The_Access_Token
is repeated many times. For example we can **get information about the space available to the user **by calling
Invoke-RestMethod -Uri "$wlApiUri/me/skydrive/quota?access_token=$wlAccess"
quota                     available
-----                     ---------
30064771072             27532934454
We can discover information about the user’s OneDrive (the API still uses the old name “SkyDrive”) with
Invoke-RestMethod -Uri "$wlApiUri/me/skydrive?access_token=$wlAccess"
This returns a lot of properties but the most useful one is upload_location, which looks like:
https://apis.live.net/v5.0/folder.1exxxxxxxxx17/files/ so this can be stored for later use
$skydriveRoot = (Invoke-RestMethod –Uri `
   "$wlApiUri/me/skydrive?access_token=$wlAccess" ).upload_location
I think it is more reliable to look up the path than to try to build it from the userID. The upload location looks like another URI that can be called with Invoke‑RestMethod with the addition of the access token:
Invoke-RestMethod -Uri "$skydriveRoot`?access_token=$wlAccess"
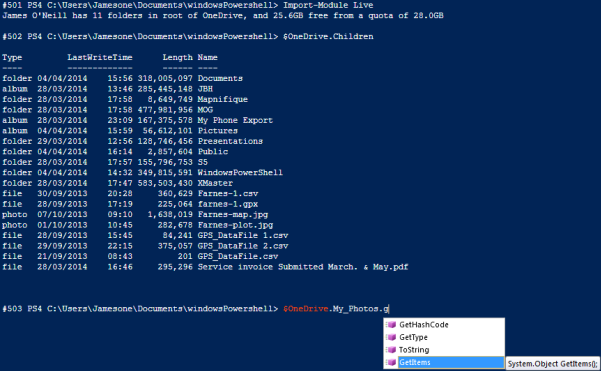
returns an array property named “data”, which contains an object for each item in the root folder of the user’s OneDrive . The list of objects can be shortened: for example adding a parameter of filter=albums,folders just the containers (other choices are photos, videos, audio, folders, or albums)
$skydriveFolders  =  (Invoke-RestMethod –Uri`
     "$skydriveRoot`?access_token=$wlAccess&filter=albums,folders").data

Write-Host ("$wlUser has " + $skydriveFolders.Count + " OneDrive root folders")
I wrote a format XML file so I could neatly display the items returned. There is more on the OneDrive APIs on MSDN at http://msdn.microsoft.com/en-us/library/live/hh826521.aspx
I created functions for Get-OneDrive (which gets the items for the root or a specified path) , Copy-OneDriveItem (to the local computer) and Copy-ToOneDrive (from the local computer).
Copying TO OneDrive uses the PUT HTTP method, if $path points to a file and $URI contains an Upload location it is invoked like this
Invoke-RestMethod -Uri $Uri -Method Put -InFile $Path
Copying FROM OneDrive puts /content into the URI after the ID and is invoked like this:
Invoke-RestMethod -Uri "$wlApiUri/$id/content?access_token=$wlAccess" -OutFile $outFile
Deleting from OneDrive uses the DELETE HTTP method, for example
Invoke-RestMethod -Method Delete -Uri "$wlApiUri/$id`?access_token=$wlAccess"
Creating a OneDrive folder is a little different: it needs a piece of JSON to describe the folder to be created – PowerShell provides cmdlets to convert to and from JSON so that’s easy. Posting to a URI creates a folder, and it command is invoked with the Access Token in a header, not in in the URL
$myBody = @{name=$name} | ConvertTo-Json
Invoke-RestMethod -Method Post -Uri "$wlApiUri/$id" `
	-Headers @{"Authorization" = "Bearer " + $wlAccess} `
	-ContentType "application/json" -Body $myBody
Live provides APIs to create contacts and calendar events – which aren’t of great interest to me as I rely on Exchange & Outlook to deal with those. But OneNote is much more interesting.
Using the OneNote Live API
The OneNote Live API uses the techniques we’ve already seen to post an HTML body to a REST URL
$wlOneNoteURI  = "https://www.onenote.com/api/v1.0/pages"
Invoke-RestMethod -Method Post -Uri $wlOneNoteURI `
	-Headers @{"Authorization" = "Bearer " + $wlAccess} `
	-ContentType "text/html" -Body $myhtml
It’s pretty much the same as adding a folder except that the JSON describing the folder has been replaced with a larger piece of HTML.
I have found that I can build more complex pages than the OneNote Live site can render successfully, but I have not drilled into exactly what the problem is I can open these pages in OneNote on my phone or PC but it crashes one of the scripts that runs on the page.
It seemed like a good idea to support everything that ConvertTo-Html can do so I built an “Out-OneNoteLive function with the same parameters
Function Out-OneNoteLive {
    Param (
    	[parameter(ValueFromPipeline=$true)]
        [psobject]$InputObject,

        [Parameter(Position=0)]
        [System.Object[]]$Property,

        [string[]]$Body,

        [Parameter(ParameterSetName='Page', Position=1)]
        [string[]]$Head,

        [Parameter(ParameterSetName='Page', Position=2)]
        [ValidateNotNullOrEmpty()][string]$Title,

        [ValidateSet('Table','List')][string]$As = 'Table',

        [Parameter(ParameterSetName='Fragment')]
        [ValidateNotNullOrEmpty()][switch]$Fragment,
        [ValidateNotNullOrEmpty()][string[]]$PreContent,
        [ValidateNotNullOrEmpty()][string[]]$PostContent
    )

    Begin { $stuff = @() }

    Process { $Stuff = $Stuff + $InputObject}

    End {
        if (Use-WindowsLive -Scope "wl.basic", "Office.onenote_create") {
            if (-not $Title)    {
                $PSBoundParameters.Add("Title",( $MyInvocation.Line + "  -  " +  (Get-Date))) }
                [void]$PSBoundParameters.Remove("InputObject")
                $myhtml = $Stuff | ConvertTo-Html  @PSBoundParameters
                $result =  Invoke-RestMethod -Method Post -Uri $wlOneNoteURI -Headers @{"Authorization" = "Bearer " + $wlAccess} -ContentType "text/html" -Body $myhtml
                $result.links.onenoteWebUrl.href
    }
    }
}
To save time I used the method for building proxy commands to get a partial script with the parameter block which I could paste into an editor
$cmd = Get-Command ConvertTo-Html
$MetaData = New-Object System.Management.Automation.CommandMetaData ($cmd)
[System.Management.Automation.ProxyCommand]::create($MetaData) | clip
The Begin block creates a new array, and the process block adds items piped into the cmdlet to the array. Then I need to call ConvertTo-Html; I modify the bound parameters, adding a title if there isn’t one and removing any input object and then I pipe whatever was input to the function to ConvertTo-Html using splatting to put in the other parameters. Once I have the HTML body it is simply a question of calling Invoke-RestMethod, looking at the result for the URI that was created and returning it.
At the time of writing the OneNote API is still looking a little bit short of features; you can follow as features are added via the teams blog http://blogs.msdn.com/b/onenotedev/ ; MSDN has the documentation for the API at http://msdn.microsoft.com/en-us/library/office/dn575420(v=office.15).aspx
Combining the parts as a module
I combined the Format file and script into a “Live” module which you can get from http://1drv.ms/1hcygmH
Enjoy
Share on: