PowerShell Tools for the Advanced Use Cases, part 1
Posts in this series
- PowerShell Tools for the Advanced Use Cases, part 1 (this article)
- PowerShell tools for the advanced use cases – part 2
- PowerShell tools for the advanced use cases – part 3
In the world of DevOps it’s all about automation–automated installation of applications, automated configuration of applications, all automated. Infrastructure as Code.
The thing is a lot of people think it is enough to just write a script and off you go. That is not enough. Code has to be tested, requirements be checked, or artefacts be built.
This article will introduce a couple of tools especially written for/in PowerShell or that can be used in combination with PowerShell that will make your production code more robust/reliable and are ultimately easy to implement into a Continuous Integration pipeline.
I am not going to talk about “Why use Source Control” here, as I am now assuming that all of you are already using some sort of Version and Source Control like Git(hub/lab), VSO, TFS, or even Mercurial. I am going to talk about some tools that are often ignored or a lot of people don’t even know exist.
PSScriptAnalyzer
Are you a member of a team? Do you share PowerShell modules inside of this team or have multiple team members work on the same code once in a while? Do you share your code to the community–via Git(hub/lab) or the PowerShell Gallery? Or, do you code for yourself but still want to follow some accepted best practises?
Enter PSScriptAnalyzer
If you have done any work on Linux or with other scripting/development languages before then you might have come across linters. Pylint, yaml-lint, puppet-lint, json-lint, rubocop, these are all examples of very mature style guide checks for several languages that are not born on Windows, but also apply to use case scenarios on Windows, so do check them out.
However, none of them checks PowerShell style. There were some tools around in the past, but now Microsoft has released the new version of PSScriptAnalyzer to their PowerShell Gallery.
| |

The module is hosted on the PowerShell Gallery and can easily be installed via PowerShellGet: Install-Module -Name PSScriptAnalyzer
The PSScriptAnalyzer module comes with two commands:

Using the PSScriptAnalyzer is more than simple. Call the Invoke-ScriptAnalyzer cmdlet and point it either to a folder with PowerShell scripts in it or to a PowerShell module and it will analyse your code.
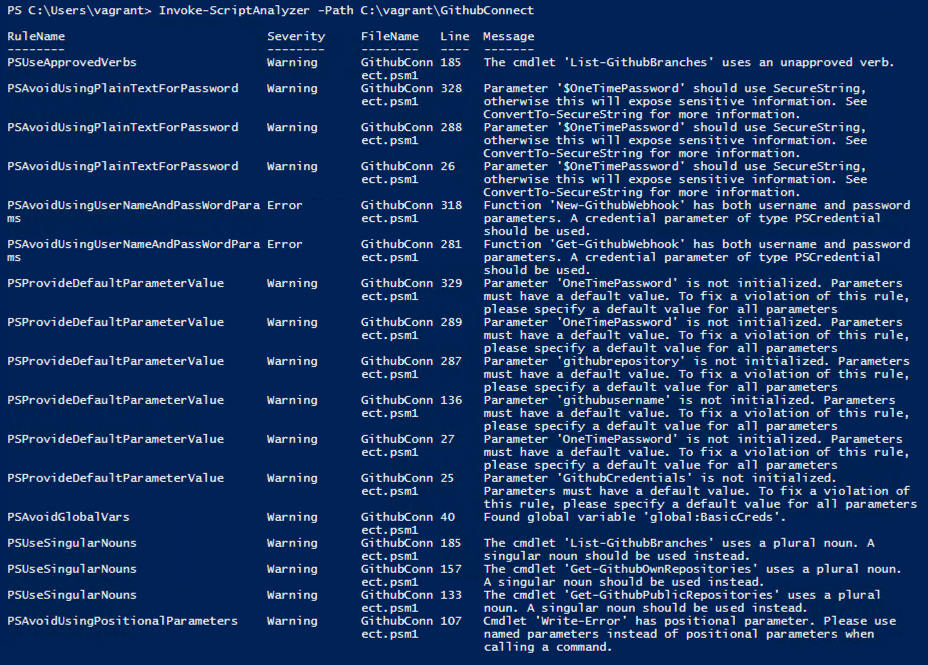
I pointed it at my GithubConnect module (an older version of it) and got these results:

With that one line my whole module has been tested against 38 built-in rules (Module Version 1.1.0, 10/10/2015) and comes back with two errors and it exactly points me to the file and line I have to go and investigate.
If you want to see all the built-in rules, call Get-ScriptAnalyzerRule and check each rule’s description.
How does PSScriptAnalyzer work?
Pretty simple, actually. PSScriptAnalyzer uses the Abstract Syntax Tree (AST) to parse a script file and check for certain patterns depending on the rule. AST has been introduced in PowerShell 3.0.
If you want to find out how to extend PSScriptAnalyzer with your custom rules or read a bit more about it, check the Github repository (here) or watch a recording of a PowerShell Summit Europe session (here).
Add it to your CI build
You don’t want to build/package code that isn’t up to anyone’s standards, right? There are two ways of achieving a nice code quality in your environment. One is fully-automated, the other one is half-automated.
I use TeamCity CI in my lab to do Continuous Integration builds every time I commit code to some of my repositories. However, I don’t want to have anything built or even uploaded to the Internet if there’s something wrong with my code. That is why I have added this little snippet of code as one of the very first steps into my CI pipeline:
| |
This code lets the build fail if there are any issues found with it. Very handy, right? This way every commit to this repository’s branch is automatically checked for issues and if any are found, the developer is informed straight away.
But, what if you don’t even want to start building every time, but want to catch issues even earlier on?
Git Pre-Commit hooks
Git is AWESOME! (Fullstop!)
Alright, thing is, you want to know about an issue as early as possible. Why even let your bad code get into source control and check it there if you can get that done earlier?
Git has a lot of functionality a lot of people don’t use, like Git hooks.
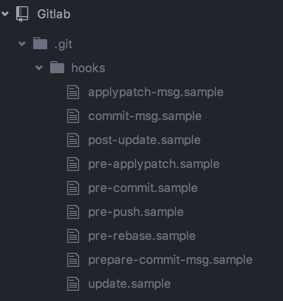
After creating a local git repository with either git init or git clone have you ever checked that ..git directory?

That directory has a subdirectory with all possible hooks, even with samples. And they are all bash shell scripts. No worries! That’s easy.
Create two new files in there. Pre-commit (no file extension!!!)
| |
Now commit something. It will now check your code for violations of style best practices. Feel free to change this snippet to your liking. If your code is stylish enough, it gets committed, if not, fix it, and come back.

In the next part of this two-part series I am going to do quite a bit of testing and validation. Stay tuned.
Share on: